Using the Makedo Tools
For some makers, using the Makedo cardboard construction tools can be an unexpected challenge.
That is ok! These are unfamiliar tools and sometimes a little guidance is all that is needed to help the maker move ahead independently.
Here are some making tips that can be handy when getting started with Makedo.
Safe-Saw
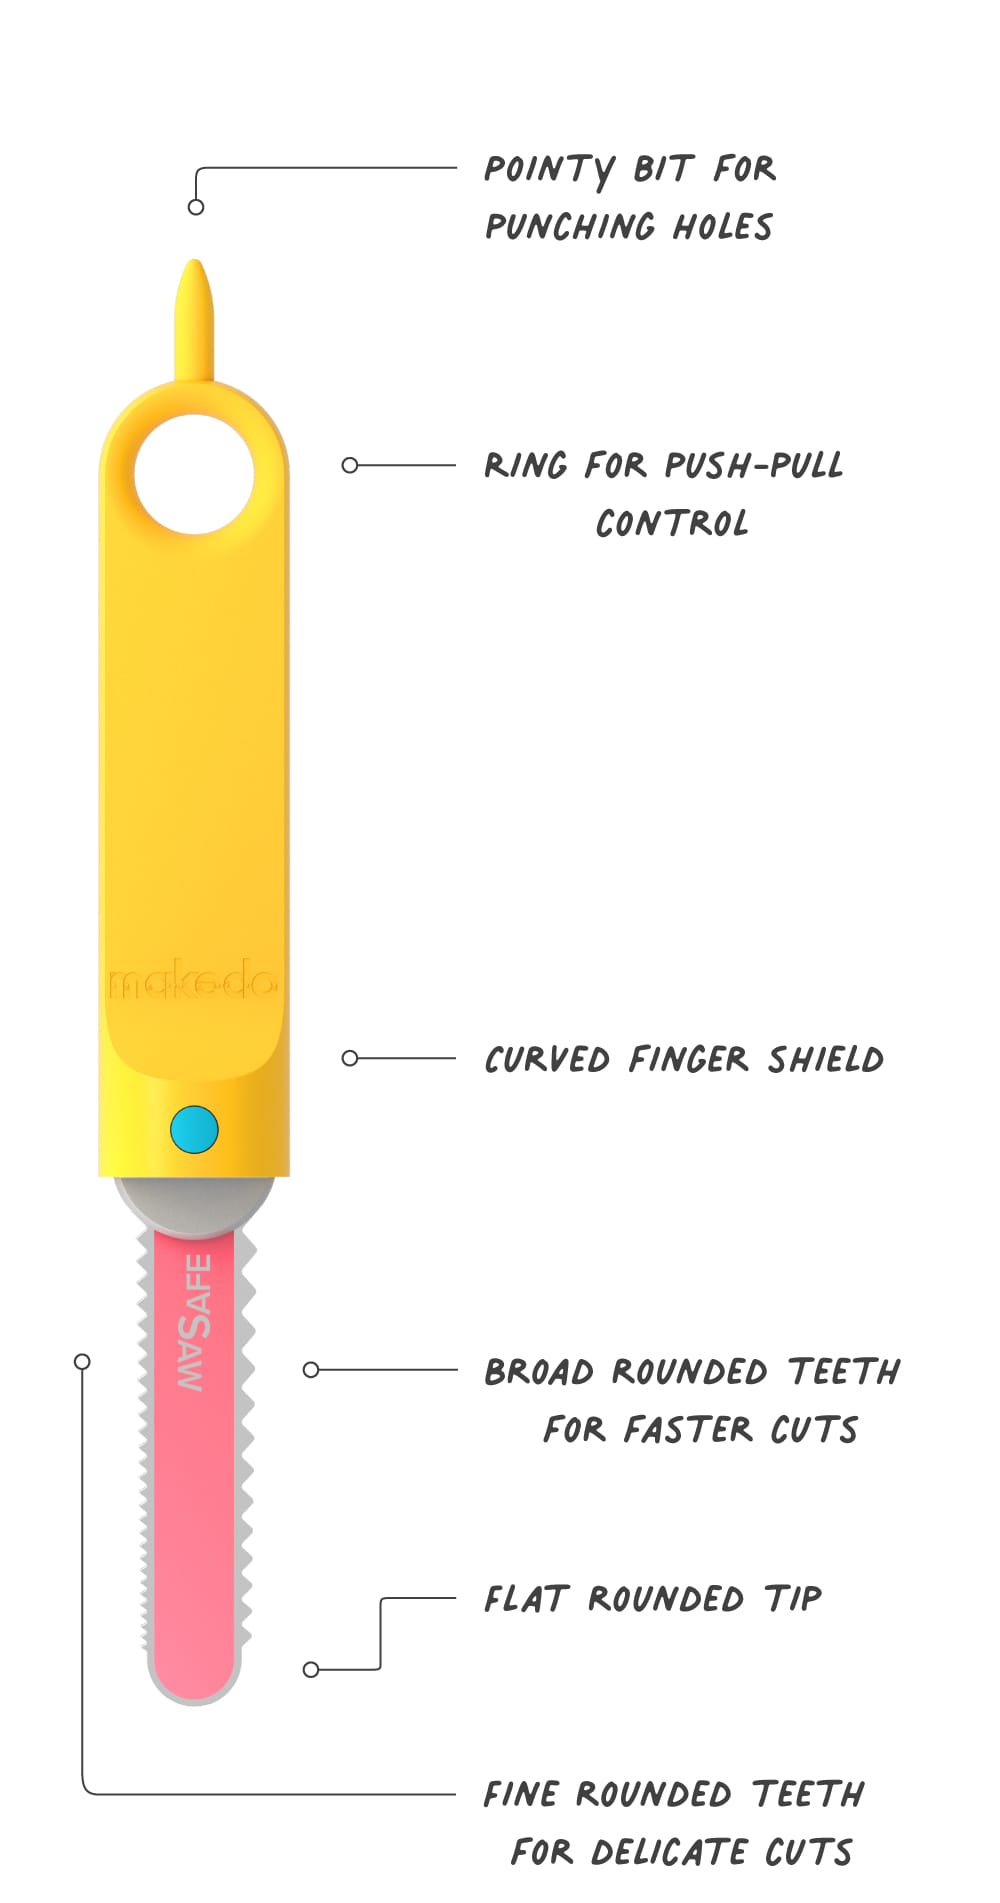
A few tips:
This is not a cutting blade! There are no sharp edges, which means it will not cut with the material laid flat (as you would with a box cutter).
The cardboard should be held vertically, this can be done by an assisting maker or by the active maker themselves.
We recommend that the maker stands above the material that is to be cut, and leans into the saw with their bodyweight rather than rapidly pulling back and forth using arm strength alone. This works in the child's favour in multiple ways. Firstly, kids often over-estimate their own arm strength! This 'saw' works differently to a carpentry saw or cutting knife, because there are no sharp edges.
The way that the smooth teeth of the Safe-Saw work is to move through the cardboard by making small micro-tears, rather than cut through as would happen when using a sharp blade. So by leaning down/forwards in the direction of the sawing motion, more accurate and controlled force can be applied. Slow and steady will be more effective than moving at super-speed.
Making the cuts:
1. The Safe-Saw is intended for larger forms, and works best on larger surfaces down to about 2-inches in width. We like to advise younger makers to try to keep the shapes they are cutting out at a size that is larger than their own hand.
2. If a maker is having trouble getting through the cardboard, another tip can be to score a line using the Fold-Roller, or punch a row of holes along the line of your cut with the spike at the end of the handle, about 1-inch apart... then use the saw to "join the dots". This works well for straight and curved cuts, as well as cutouts such as holes, windows or doors.
Fold-Roller

This tool is for making perforated lines in the cardboard. These lines then enable the cardboard to be folded or shaped with greater precision and control. It is not a cutting tool and is not intended to be used to cut all the way through the cardboard.
The spaced teeth on the wheel of the Fold-Roller are specifically designed to pierce the surface of the cardboard at regular intervals. The result is a dotted line that can be used to fold the cardboard or as a guide for cutting with the Safe-Saw.
Scru-Driver

The companion tool to the Scru and Scru+ connector. For connecting cardboard quickly and securely. Reach into narrow spaces, use different grip styles, and connect the Scru with a familiar twisting action. Enables rapid deconstruction of Makedo creations so that the cardboard is left clean and ready to be reused or recycled, and the Makedo Scrus are reclaimed for your next creation.
Scru and Scru+

Before inserting the Scru, first punch a hole through the layers of cardboard that are to be connected. This hole can be punched with the handy spike that is at the end of each yellow Makedo tool handle. You will also find one on the smaller Mini-Tool, which is the round yellow tool featuring a punch and a socket for the Scru connector. When the time comes for disassembly, the Scru is easily removed leaving the cardboard clean and ready to be reused or recycled.
Makedo Scrus can be reused over and over (and over) again!
The smaller Makedo Scru is designed to connect up to 3x layers of corrugated cardboard.
The larger Makedo Scru+ is designed to connect up to 5x layers of corrugated cardboard, and also 3D printed attachments or other additions to the Makedo cardboard construction system.
Mini-Tool

Always on hand for extra making, it's a Scru-Driver made mini! Reach into smaller spaces, slip one in your pocket or wear it like a ring. Invite your parents, siblings, cousins and friends to join in the making with Makedo.
The Mini-Tool features an easy-grip ring that can be twisted like a wingnut when connecting or disassembling. Some younger makers find this action more intuitive and physically easier than the linear format of the Scru-Driver.
Further reading...
We recommend that you take a look at some of the content on our website. If you browse to the home page on a laptop or desktop computer, you will see the video banner at the top that has a brief snapshot of each tool being used.
www.make.do
Additionally, the function of each tool and connector is outlined in the "Smarter by Design" section on the main product pages.
The Smarter by Design section can be found just below the main product gallery when viewing on a desktop or laptop computer. It is a rotating slideshow containing both a short video and descriptive image for each tool, so be sure to click the right arrow to see the next tool when you are ready to proceed.
https://www.make.do/products/makedo-explore
...still need more tips to get moving with Makedo?
Download our handy printable Starter Guide here:
Makedo Starter Guide
PDF 1.1mb